Fitting Instructions & Selecting CERA Endurance Shoes
This synthetic horseshoe differs in several important ways from conventional horseshoes:
-
A CERA Endurance Shoe is a cushioning shoe.
- A CERA Endurance Shoe is not a heated shoe.
- A CERA Endurance Shoe is not a so-called corset (iron horseshoe).
- The foot holding properties of CERA Endurance Shoes are similar to those of the bare hoof.
- A CERA Endurance Shoe weighs much less than a conventional 8mm iron horseshoe.
- With CERA Endurance Shoes, rubbing on the extremity of the lower leg is prevented.
- CERA Endurance Shoes stimulates the growth of the horny laminae by massaging the hoof.
Choosing the Correct CERA Endurance Shoe
A standard CERA Endurance Shoe ( Equi ** Hoof plate) is available in sizes 00(front or back), 01(front or back), 03(front), 03(back), 04(front), 04(back), and 05(front or back), with each having one toe clip and two side clips.
There are three Natural Balance CERA Endurance Shoes (HIPPO ** Hoof plate) to choose from as well - small (NBS S); medium (NBS M); and large (NBS L). The toe is squared and slightly rolled. There are two side clips. These CERA Endurance Shoes are designed for the front hoof only.
Two or four stud spikes maybe knocked into the standard CERA Endurance Shoe or the Natural Balance CERA Endurance Shoe.
Two or four stud spikes maybe screwed into specially designed standard CERA Endurance Shoe or the Natural Balance CERA Endurance Shoe (EQUI/HIPPO ** for 4 inserts 1/4''). These shoes are designed for grip in muddy conditions, long distance rides and durability.The height of the screw in stud can be altered.
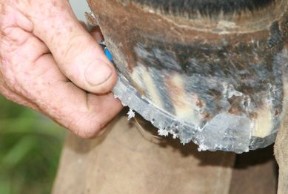
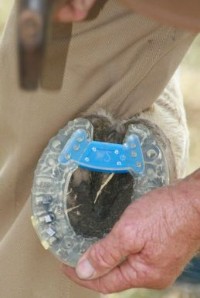
The bridge is fastened to the hoof plate with six screws. Bridges determine the width of the shoe over the frog and are available in sizes 1 to 6. The hoof plate can exceed the hoof-wall by about 2mm, and this is desirable from the widest part of the hoof back, especially for the first shoeing, when the hoof usually expands. Do not trim or rasp back this 2 mm hoof plate.
CERA recommends the 2mm excess for the horse that have plastic on for the first time because usually the hoof gets a bit wider within the first few weeks. From the widest part of the hoof backwards the hoof moves more on plastic than on a steel shoe, so the 2mm gives a safety zone.
Measuring the Hoof for a CERA Endurance Shoe
Preferably, measurements are done on a freshly trimmed hoof. See the CERA Size Chart (below). Use it as a guide for determining the length/shoe size. Then choose the bridge. A smaller bridge will narrow(decrease width) the hoof plate while a larger bridge will broaden(increase width) the shoe. Select shoe and bridge combination that best suits your horse. If in doubt select the bigger size. The best stability comes from a big hoof plate and a small bridge.
When measuring the length - go from toe to the back of the bulb - the hoof plate can be longer then the hoof - simply trim back if necessary using pinchers and/or rasp.
When measuring the width - measure the widest part of the hoof. If in doubt buy a couple of different size bridges.
Putting on CERA Endurance Shoes
1. Trimming - Treat the sole and frog with care. Cut back to the same level as the outer wall. Remove only excess sole and frog material. Cut the frog back far enough to allow the bridge (attached to the hoof plate) to rest on the frog, such that no pressure will be created when the hoof plate is finally nailed onto the hoof. This method allows the frog to be massaged additionally, thus stimulating blood circulation as well as horn growth.
If the frog is under-developed, special attention should be given to the development of a full and healthy frog within a few months so that weight bearing can be accepted.
For CERA Endurance Shoes the hoof can be prepared and shaped, as it would be for the horse going barefoot. However, more of the outer portion should be retained, as the shoe requires a little more supporting surface (resulting from the wider design). Prepare part of the sole for this. Trim so that the sole fits the plane of the shoe. The horse shoe should cover the whole hoof completely.
The outer and inner wall of the hoof can be bevelled from 1mm at the back up to 3mm at the toe. In this way the hoof won’t grow so quickly over the edge of the shoe.
With CERA Endurance Shoes, the heels become wider and consequently, the first shoeing period maybe earlier than usual.
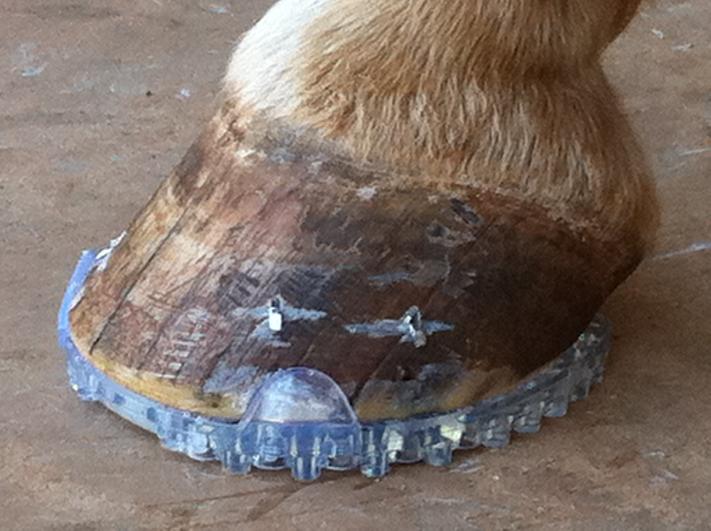
2. Position the nail holes, toe clip and side clips - Due to the transparency of the CERA Endurance Shoe, the white line should be clearly visible. Although a pen maybe used to mark the white line on the hoof.
Place the horseshoe onto the hoof and mark the nail holes. Mark 6 holes to the front of the hoof, prior to the widest part of the horse's hoof. Always pre-drill the 4 to 6 marked nail holes with a 2-3 mm drill bit.
Position the toe clip by using the nippers or hoof knife to cut the hoof if needed or allow the toe and side clips to sit beside the hoof wall. The toe clip can be removed, but for horses who drag their hind hooves, leave in place for added protection.
DO NOT REMOVE THE SIDE CLIPS! The side clips function to keep the shoe stabilized, acting against the natural sheer forces. The side clips DO NOT need to sit flush against the hoof wall, as with steel shoe side clips. See photos below and throughout website. Again nippers or a hoof knife maybe used to cut into the hoof to position the side clips, but this is not always necessary. The side clips may stick out/up. This is ok.
CERA recommends a 2mm excess of the shoe at the widest part of the hoof. If this is achievable, it provides a platform for horse when first shod with the plastic shoe for the hoof to grow onto as it usually gets abit wider within the first few weeks. Also, from the widest part of the hoof back, the hoof moves more on the plastic hoof plate than on a steel shoe, so the 2mm gives a "safety zone" for supporting the hoof wall and sole.
3. Nailing - Given that the nails must withstand greater sheering pressure than with conventional horseshoes, when horseshoes are fitted, nailing should be about 5mm deeper than with conventional iron shoes. The nails should be inserted parallel to the hoof wall. We recommend that six nails be used per shoe. Use large nails (E5 size). The exact placement for the nails should be selected according to the stability of the hoof wall. It is preferable to place the nails towards the front of the hoof, and not past the widest part of the hoof.
Hammer the nail in. Then with a CERA nail punch, drive the nail in deeply, firmly, and evenly (approx. 1–2mm below the lip of the nail positioning hole) into the shoe so that it is properly fixed. A special CERA nail punch tool is available to recede the nails securely down into the nail slot on the shoe.
4. Clinching - The nails are finally clinched hard with a special CERA clincher adaptor tool. Using the clincher adapter is very important!! The clincher holds the nail head in position in the nail hole when clinching and ensures the nails are secured tightly.
The clincher tool ensures you do not push back the nails out when clinching, endangering the correct position of the shoe. The clincher adaptor tool has a guiding element on the straight shank which helps hold the nail head in position on the hoofplate when clinching and ensures the nails are secured tightly.A correctly fitted CERA Endurance Shoe horseshoe has a normal shoeing period of 4 - 6 weeks. However, common sense and horse welfare must pre-vial.
CERA Endurance Shoes can be fitted with studs (either screw in or knock in), which allows them to be used under the most trying conditions. Always pre-drill the four holes before inserting the studs.
With additional processes CERA Endurance Shoes can also be glued. It is therefore also suitable for complicated cases.
See the "About Us" web-page for a detailed, photo step-by-step "CERA Shoeing Guide".pdf file for further information.
Thanks very much and enjoy your ride.

|
CERA_Size_Chart.pdf Size : 0.843 Kb Type : pdf |
Contact: Clare Fleming
Phone: 04 00 89 04 46
Email: flemingoendurance@gmail.com
Left: Once the nails have been hammered into place, use the nail punch tool to receed the nails down secure into the shoe.
Right: Once the shoe has been nailed into position, a rasp can be used to trim the shoe back so that a 2mm excess is present at the widest part of the hoof. This will provide support for the expanding hoof.